 The art of sewing could be more enhanced by understanding the concept of serging.
It is considered quite useful to produce clean and smooth finishes of edges of the fabric by simply trimming and sewing attractive hem along the raw edges.
The problem is that acquiring such a machine could be expensive for most people.
Therefore, you surely need an alternative in order to get your job done.
Fortunately, you can easily serge using an ordinary sewing machine.
So, just read the article to discover how to Serge with a sewing machine.
So the first thing that you need to consider is that whether you should serge before sewing or after.
Well, you do it both ways, before and after sewing the seam. But it is not necessary all the time, some serge as they make the seam.
It’s also a fact that it’s a common discussion in the sewing community whether it is better to sew first or serge first.
As far as those are concerned who are new to serging, it’s wise to sew first then serge.
Because, this would help you avoid error, especially while working challenging seams.
But if you prefer to serge then sew, it will surely give you an edge when sewing a zipper, for example.
Types of fabrics
Overlocking lightweight fabrics, such as batiste, chiffon, organza, voile can be difficult.
The problem is that if the fabric is very thin, it’ll get pulled into the feed dogs, which will eventually l chew it up.
One appropriate solution is to overlock your seam allowances together and then press them to one side.
You can also strengthen your seam with spray starch or even seam tape.
Or you could try to stabilize your fabric with tissue paper or some other paper under your fabric and tear it away after you’ve finished the seam.
Understanding of some important concepts
You might not know this but the alternative to a serger is an overlock, as they both complete the same task.
So, “overlocker” refers to the machine in the UK whereas “serger” is the American preference.
The thing is that an overlock stitch is just another way to manage a similar effect without the need of purchasing another expensive machine.
A serger provides edges with a professional finish when done in a correct manner.
Sometimes, an overlock foot can possibly create the illusion of a serged edge.
Actually, It’s considered the difference between an expensive designer bag and a perfect knock-off. The only condition is that you should be able to tell the difference.
But, when it comes to overclocking, there is no need for an overlock foot, which is a way affordable investment.
The plus point is that it would help to have an overedge or overlock stitch.
Well, another alternative is to have a ladder or a pin stitch.
The ladder stitch is considered as the “invisible” stitch, but can also be used to give seams and edges a perfect finish.
Whereas pin stitch is generally used to attach lace tape onto fabric. Well, they can be quite pretty and are always well-secure.
There is something common, they provide more security through the stitch pattern’s design.
Learn the art of serging with a sewing machine
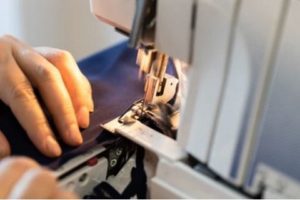
Sew the seams
Start with sewing the seams and trim so that you’ll have almost 1/4 inches for serving.
It’s better to read the manual of the specific sewing machine you own and also remove its standard presser foot.
You need to replace the foot with an overcast. Then use your stitch selector to use the overlock or zigzag stitch, best for serving.
In the absence of an overcast or overlock foot, any presser foot with a wide hole in the middle can also be used.
Appropriate stitch length
It is recommended to use a reasonable stitch length and width, normally 2.5mm and 3.5 mm.
Then carefully place the fabric underneath the foot and see whether the guide on the machine is aligned with the fabric edge or not.
As far as light to medium materials is concerned, just finish the seam allowance together but finish the seam allowance separately only for heavier weight fabrics.
Align the needle
Now you need to turn the needle towards your side slowly and then adjust the width of the stitch only if you see that the needle is hitting the foot.
You have to align the needle with the bridge in order to avoid getting uneven stitches and also make zigzag stitches along the fabric hem.
It’s better to make sure that the edges are properly aligned with the guide on the foot while sewing the seam allowances.
Don’t forget to check whether the right-hand point of each zigzag is reaching the fabric edge or not.
Back stitching
Now, you need to backstitch the beginning and along with the seam to purify the art of zigzag stitches.
It is recommended not to pull your fabric after finishing serging, because the chances are high that it might damage the stitches.
Lastly, just press the seams open to finish.