 When you get warm and cozy in a quilt, it may cross your mind to create a quilt yourself.
Is it possible to make one with a standard domestic sewing machine?
Duh! Of course, you can make a quilt with a regular household sewing machine.
You just need a few tools, proper space for sewing and the will to start.
As a beginner, you may not know how to quilt on a sewing machine.
Don’t worry. We have got your back. The learning journey is a bit challenging and bumpy, to be honest.
However, we have made it easier for you by sharing instructions and tips in the article below.
How to Quilt on a Sewing Machine
Just dare to start machine quilting on your domestic unit.
You will become master with time and practice.
Read on to find out how to quilt on a sewing machine with little hassle.
Find a Spacious Table Surface
First, you need to find a table with as spacious a surface as possible.
Quilting and managing the weight of the quilt material at the same time is tricky.
Your project will keep falling off the table if it has limited space.
If this happens, then not only your work momentum will get disturbed, but the stitches will also get ruined.
So, a spacious tabletop it is. You will get ample room to manoeuvre your project around, may it be a baby size quilt or a big king size one.
Tip: Keep the majority of the quilt material in your lap instead of accommodating all on the table.
This will alleviate the weight and prevent the article from being pulled down. As a result, you will evenly feed the quilt through the machine.
Start with a Small Project
Don’t begin with a mega-size quilt. It will be too hard to manage. Start with baby steps, you know.
Your project better stay within 36-50 inches size range.
Anything smaller than that will unnecessarily increase your workload.
Not to mention, you might accidentally sew your finger. Ouch!
Begin with a Simple Design
You should begin quilting with a simple design for your initial project, like a simple square or block in a diagonal shape.
It is easy and quick to learn as you will need to sew straight lines.
Plus, it will also help you learn to control the stitch length and guide the fabric.
Make Layers of the Quilting Fabric
The quilting fabrics are divided into three layers.
- Backing
- Batting
- Top piece
The backing and batting layers should be 2-3 inches larger than the top piece.
Batting is of two types: Poly batting and cotton batting. Both are okay. So, you can go either of the two.
You have to lay the layers flat on one another and staple them together.
You can use a basting spray or safety pins to keep the layers in place.
I prefer basting spray as it gets the job done quickly and makes quilting a breeze.
Just sprinkle a moderate amount of spray between each layer.
I don’t have any grudge against safety pins. You can use those too if basting spray isn’t available.
You will just have to be ultra-careful and spend extra time.
You will have to pause frequently to unpin a section. Try not to stop too close to the pinned area.
Why? Feed dogs make it harder to remove the pin.
You will also need an ironing machine to smooth out the folds.
Flattened layers are easy to sew and guide.
Note: Poly material shrinks in heat. So, always use a cool iron for poly batting.
Make a Quilt Sandwich
Take the backing piece and place it right side down. Iron out the creases to lay it flat.
Now, spray the basting spray all over it. After that, put the batting layer over the backing fabric.
Again, spray the basting spray over the entire surface of the batting layer.
Place the top piece over the batting layer. Now, press the three layers with your hand or iron them to make them smooth and flat.
This sandwich block is ready to sew.
Start Sewing
Place that sandwiched block on the sewing machine and sew all its edges. Prepare the second block the same way.
If you work on a larger quilt, divide the entire fabric into four equal squares and pin the center.
Start the design from the center and move towards the edge of each square.
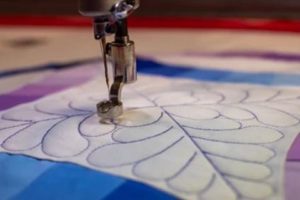
A regular free motion quilting foot will help you create these simple patterned quilts with less hassle.
With time and practice, you will become skilled enough to create intricate motifs on your quilts to make them appear more beautiful and customised.
Things to Keep in Mind
I am sharing a couple of tips that I found extremely helpful when I started my quilting journey with my household sewing machine. I hope they help you the same way.
- Start sewing at a slower pace. I know I sound like a killjoy right now, but you will thank me for this tip. Since you will be sewing through many layers at once, cruising through the article will result in uneven and clumsy stitches. Not to mention, sewing at a fast speed makes it hard to keep a firm grip on the fabric.
- Look at where your stitching lines are headed instead of focusing on the needle. When you start looking ahead, you end up stitching more straighter lines.
- Concentrate on the section you’re quilting. This will help you smooth out the fabric to avoid wrinkling or bubbling.
- Change the needle frequently – after the third bobbin change, to be more precise. That’s because a sharp needle improves the stitch quality.
- Avoid choosing dark colour fabric for the backing layer, especially if you’re a beginner. It will hide most of your skipped or uneven stitches. Since you will not be able to see your mistakes and correct them on time, your quilt will turn out to be frail.
- Check the thread tension after delivering the first couple of stitches. That will enable you to detect a tension-related issue, if there’s any, on time. Do a test patch every time you change the bobbin.
Conclusion
On that note, we would end this session of learning how to quilt on a sewing machine.
Quilting on a regular sewing machine is trickier, but you can master the skill with practice and patience.
You need to start with smaller projects and gradually move to more challenging and larger designs.
I am sure the tips I shared above will help you a lot in your learning journey. So, don’t overthink and dive in to make one for yourself.